
现在阿里云的免费证书有效期只有 3 个月, 过期之后还要重新签发 😡, 所以我开始尝试寻找免费可自动续签的证书服务, 就是使用 Certbot 配置 Let’s Encrypt 免费证书
介绍
Let’s Encrypt
Let’s Encrypt: 这是一个由非营利性组织互联网安全研究小组(ISRG)提供的免费、自动化和开放的证书颁发机构。它为众多网站提供 TLS 证书,其免费证书的签发/续签可以通过脚本自动化完成, 简而言之就是可以免费一直用
certbot
Let’s Encrypt 使用 ACME 协议来验证您对给定域名的控制权并向您颁发证书。 要获得 Let’s Encrypt 证书,您需要选择一个使用 ACME 客户端软件, 而 Certbot 就是 Let’s Encrypt 推荐的客户端
安装 cerbot
TIP服务器环境为
Ubuntu 22.04
sudo snap install --classic certbot# sudo apt-get install certbot # 或者使用 apt 安装安装 aliyun cli
wget https://aliyuncli.alicdn.com/aliyun-cli-linux-latest-amd64.tgztar xzvf aliyun-cli-linux-latest-amd64.tgzsudo cp aliyun /usr/local/binrm aliyun配置 aliyun cli
- 创建
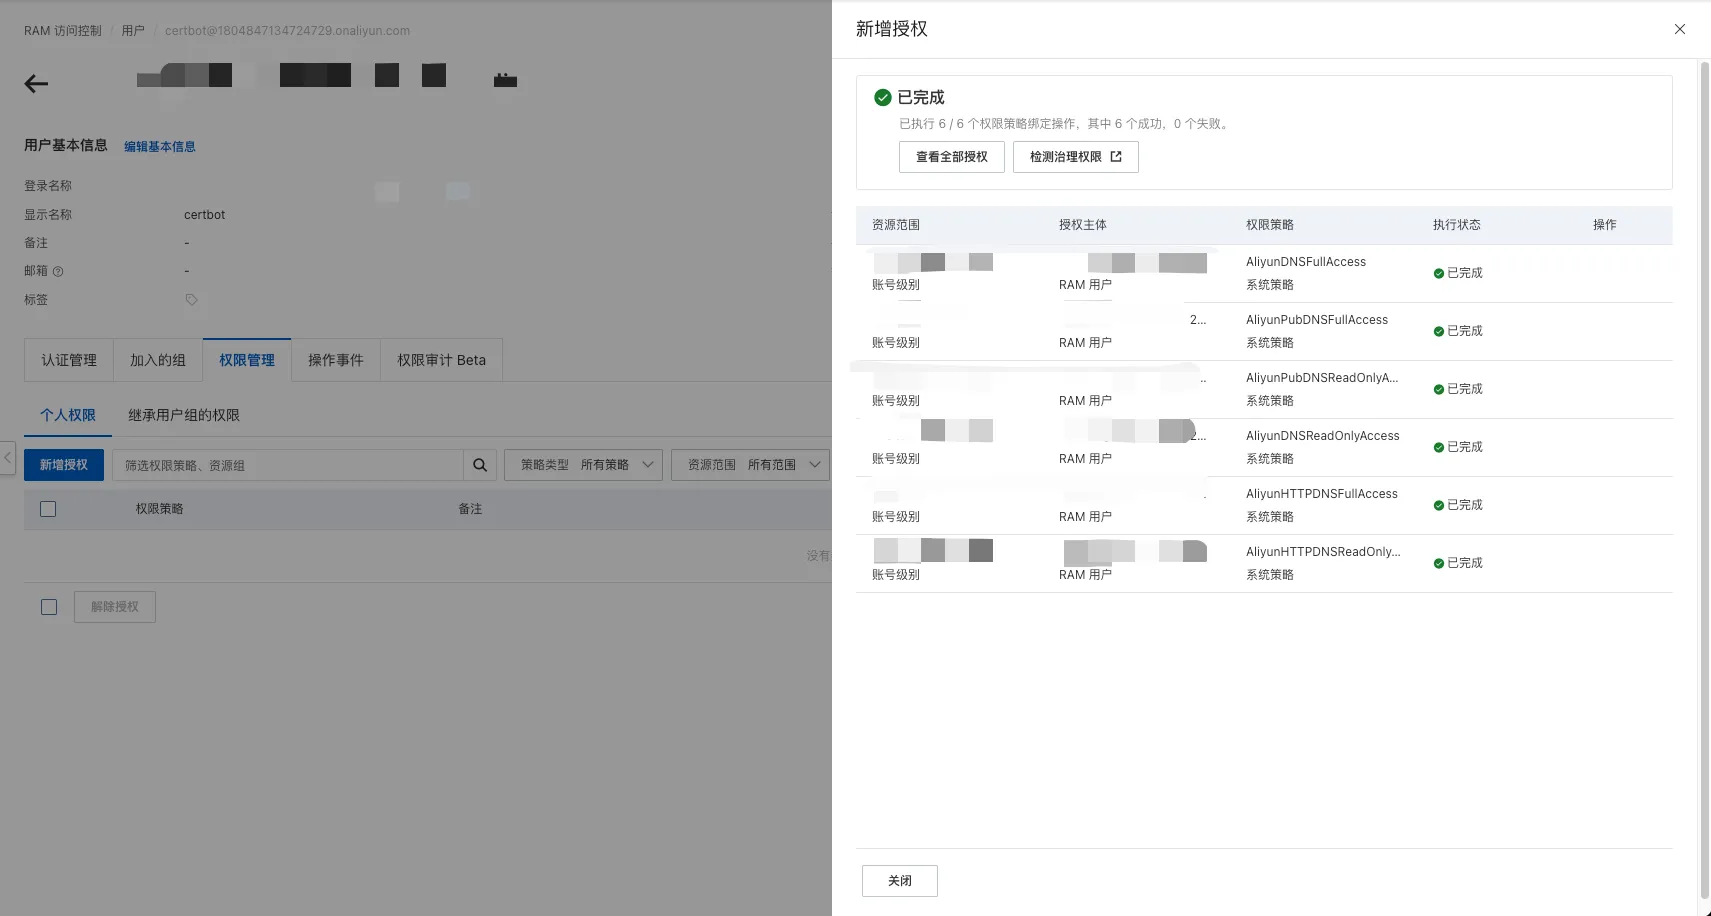
RAM用户, 参考 创建 RAM 用户的 AccessKey - 点击 权限管理 -> 新增授权, 为
RAM用户添加DNS解析相关的权限(可在权限列表中搜索DNS)
-
点击 认证管理 -> AccessKey, 创建
AccessKey -
配置
AccessKey的网络访问权限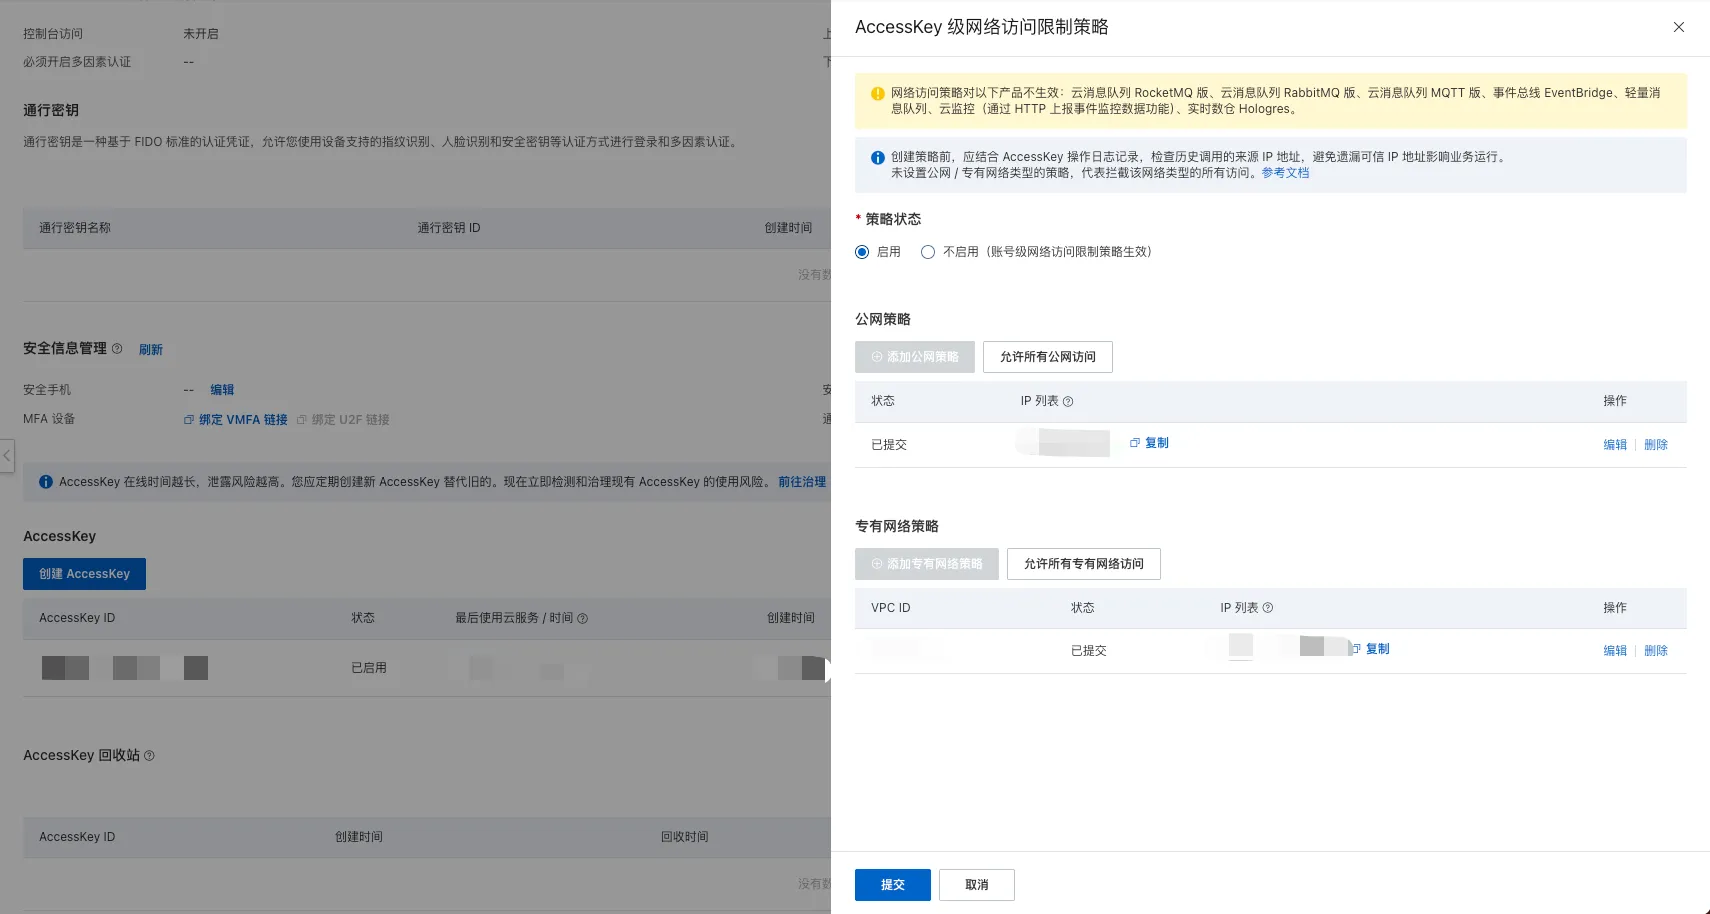
-
执行 aliyun configure
aliyun configureConfiguring profile 'default' in 'AK' authenticate mode...Access Key Id [*********************SQK]:Access Key Secret [***************************LJL]:Default Region Id [cn-hangzhou]:Default Output Format [json]: json (Only support json)Default Language [zh|en] zh:Saving profile[default] ...Done.
Configure Done!!!..............888888888888888888888 ........=8888888888888888888D=.........................88888888888888888888888 ..........D8888888888888888888888I....................,8888888888888ZI: ...........................=Z88D8888888888D...................+88888888 ..........................................88888888D...................+88888888 .......Welcome to use Alibaba Cloud.......O8888888D...................+88888888 ............. ************* ..............O8888888D...................+88888888 .... Command Line Interface(Reloaded) ....O8888888D...................+88888888...........................................88888888D....................D888888888888DO+. ..........................?ND888888888888D.....................O8888888888888888888888...........D8888888888888888888888=....................... .:D8888888888888888888.........78888888888888888888O ..............TIP输出最后的阿里云
logo图案表示配置成功
安装 certbot-dns-aliyun 插件
wget https://cdn.jsdelivr.net/gh/justjavac/certbot-dns-aliyun@main/alidns.shsudo cp alidns.sh /usr/local/binsudo chmod +x /usr/local/bin/alidns.shsudo ln -s /usr/local/bin/alidns.sh /usr/local/bin/alidnsrm alidns.sh申请证书
测试是否能正确申请证书
certbot certonly -d "*.example.com" --manual --preferred-challenges dns --manual-auth-hook "alidns" --manual-cleanup-hook "alidns clean" --dry-run
The following error was encountered:[Errno 13] Permission denied: '/var/log/letsencrypt/.certbot.lock'Either run as root, or set --config-dir, --work-dir, and --logs-dir to writeable paths.Ask for help or search for solutions at https://community.letsencrypt.org. See the logfile /tmp/certbot-log-4krk5x0b/log or re-run Certbot with -v for more details.TIP把
example.com替换为实际的域名
这里我们使用的是非 root 用户, 所以是没有 /var/log/letsencrypt 的访问权限的, 所以我们根据提示信息配置生成的目录:
certbot certonly -d "*.example.com" --config-dir $HOME/.certbot/config --work-dir $HOME/.certbot/work --logs-dir $HOME/.certbot/logs --manual --preferred-challenges dns --manual-auth-hook "alidns" --manual-cleanup-hook "alidns clean" --dry-runSaving debug log to /home/admin/.certbot/logs/letsencrypt.logEnter email address or hit Enter to skip. (Enter 'c' to cancel):
- - - - - - - - - - - - - - - - - - - - - - - - - - - - - - - - - - - - - - - -Please read the Terms of Service at:https://letsencrypt.org/documents/LE-SA-v1.5-February-24-2025.pdfYou must agree in order to register with the ACME server. Do you agree?- - - - - - - - - - - - - - - - - - - - - - - - - - - - - - - - - - - - - - - -(Y)es/(N)o: YAccount registered.Simulating a certificate request for *.example.comHook '--manual-auth-hook' for example.com ran with output: { "RecordId": "1234", "RequestId": "5678" }Hook '--manual-cleanup-hook' for example.com ran with output: { "RecordId": "1234", "RequestId": "5678" }The dry run was successful.其中 ~/.certbot/config 是存放证书和私钥的目录, 请按照实际情况进行修改
TIP此命令申请的是
*.example.com的证书, 如需同时申请顶级域名或其他 多个域名的证书, 可以增加-d example.com参数生成, 并增加--cert-name指定生成的目录(因为生成顶级域名和子域域名证书时, 生成的目录名可能重复, 此时会生成例如example.com-0001的目录名)
正式申请证书
把 --dry-run 参数去掉就可以申请到证书了, 只要有 --dry-run 参数时执行成功, 就可以正确生成证书了
最终的命令如下:
# 1. 申请顶级域名的证书certbot certonly -d "example.com" --cert-name "example.com" --config-dir $HOME/.certbot/config --work-dir $HOME/.certbot/work --logs-dir $HOME/.certbot/logs --manual --preferred-challenges dns --manual-auth-hook "alidns" --manual-cleanup-hook "alidns clean"
# 2. 申请一级子域名通配符证书certbot certonly -d "*.example.com" --cert-name "all.example.com" --config-dir $HOME/.certbot/config --work-dir $HOME/.certbot/work --logs-dir $HOME/.certbot/logs --manual --preferred-challenges dns --manual-auth-hook "alidns" --manual-cleanup-hook "alidns clean"证书续期
certbot renew --manual --config-dir $HOME/.certbot/config --work-dir $HOME/.certbot/work --logs-dir $HOME/.certbot/logs --preferred-challenges dns --manual-auth-hook "alidns" --manual-cleanup-hook "alidns clean"Saving debug log to /home/admin/.certbot/logs/letsencrypt.log
- - - - - - - - - - - - - - - - - - - - - - - - - - - - - - - - - - - - - - - -Processing /home/admin/.certbot/config/renewal/all.example.com.conf- - - - - - - - - - - - - - - - - - - - - - - - - - - - - - - - - - - - - - - -Certificate not yet due for renewal
- - - - - - - - - - - - - - - - - - - - - - - - - - - - - - - - - - - - - - - -Processing /home/admin/.certbot/config/renewal/example.com.conf- - - - - - - - - - - - - - - - - - - - - - - - - - - - - - - - - - - - - - - -Certificate not yet due for renewal
- - - - - - - - - - - - - - - - - - - - - - - - - - - - - - - - - - - - - - - -The following certificates are not due for renewal yet: /home/admin/.certbot/config/live/all.example.com/fullchain.pem expires on 2025-07-26 (skipped) /home/admin/.certbot/config/live/example.com/fullchain.pem expires on 2025-07-26 (skipped)No renewals were attempted.- - - - - - - - - - - - - - - - - - - - - - - - - - - - - - - - - - - - - - - -配置定时自动续期
crontab -e# certbot renew1 1 */1 * * bash -l -c 'source /home/admin/.profile && certbot renew --manual --config-dir $HOME/.certbot/config --work-dir $HOME/.certbot/work --logs-dir $HOME/.certbot/logs --preferred-challenges dns --manual-auth-hook "alidns" --manual-cleanup-hook "alidns clean" --deploy-hook "sudo nginx -s reload"'这里我用的是 admin 用户, 而不是 root, 所以 source /home/admin/.profile 是为了加载 admin 用户的环境变量
配置 nginx
配置一下 nginx 配置文件, 创建一个软连接将指定域名的证书文件链接到我们生成的证书目录下
server { listen 443 ssl; server_name example.com; charset utf-8;
###### certbot START ######## #填写证书文件绝对路径 ssl_certificate conf.d/certbot/example.com/fullchain.pem; #填写证书私钥文件绝对路径 ssl_certificate_key conf.d/certbot/example.com/privkey.pem; ###### certbot END ########
ssl_session_cache shared:SSL:1m; ssl_session_timeout 5m;
#自定义设置使用的TLS协议的类型以及加密套件(以下为配置示例,请您自行评估是否需要配置) #TLS协议版本越高,HTTPS通信的安全性越高,但是相较于低版本TLS协议,高版本TLS协议对浏览器的兼容性较差。 ssl_ciphers ECDHE-RSA-AES128-GCM-SHA256:ECDHE:ECDH:AES:HIGH:!NULL:!aNULL:!MD5:!ADH:!RC4; ssl_protocols TLSv1.1 TLSv1.2 TLSv1.3;
#表示优先使用服务端加密套件。默认开启 ssl_prefer_server_ciphers on;
# example.com => blog.example.com rewrite ^/(.*)$ https://blog.example.com/$1 permanent;}其中 ssl_certificate 是证书文件路径, ssl_certificate_key 是证书私钥文件路径
sudo ln -s /home/admin/.certbot/config/live/example.com /etc/nginx/conf.d/certbot/example.comsudo ln -s /home/admin/.certbot/config/live/all.example.com /etc/nginx/conf.d/certbot/all.example.comTIP这里根据实际情况进行配置, 以上路径只是实例
最后在浏览器中查看证书信息:

如果颁发者组织是 Let's Encrypt, 表示配置成功 🎉